
Need Help?
Call Service Now
630-226-0011
Installation
There are 2 primary means of describing installation techniques for our shower floor. Our online video and our flyer included in the box with the shower pan. Both can be found here on this page below, as well as answers to frequently asked questions about installations.
Watch The Shower Base Install Video!
Shower Base Install Video
This video is our primary resource for describing our recommended installation technique. Yes, other techniques can work well, but we believe this video is a must see for all installers.

Front

Back
In-Box Installation Guide
This simple 1 page front-and-back guide is included in the box with every shower base. Click to view.

Tip: Avoid open areas around the drain.
This is not a picture of our shower base. We're including as an illustration that some drains have large open air gaps around them where there should ideally be supportive subfloor. Our shower base requires a fully supported subfloor. If the subfloor is damaged to the point where the area around the drain is open or compromised, fix that before installing.
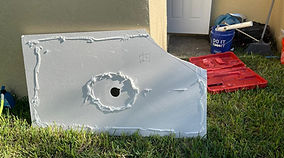
Too much dead air space...

That's better...
Tip: Apply complete and uniform coverage to backside - leave no air gaps.
While we recommend using mortar to install the shower base, we have a multitude of installers who have successfully used silicone instead - some having done this for decades without a problem. That isn't the concern shown.
What we're illustrating here is that there shouldn't be areas of the base with large unsupported air gaps underneath. For a silicone installation like the one on the left, we think it's best to use a tightly spaced checker pattern, so the adhesive support is evenly distributed over a large surface area.
Click to View This Flyer Included In Every Box
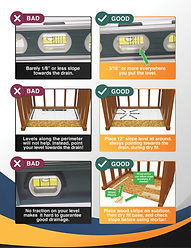
Question: "Can't I just use a normal 4 foot level to check for adequate slope?"
Technically yes, but we think it's unideal. We believe the best way to get adequate slope and therefore great water drainage is to have one of those handy little 1-foot levels with the fractions display on it. Also, make sure to actually point the thing towards the drain, rather than laying it across the perimeter.
Every shower base box ships with a 1 page flyer demonstrating what we believe are good vs. bad habits with the level. You can see the back side of that flyer here. Visit the Testing Page to see the rest of the flyer and more information about water drainage.
Please watch this important 30s video!
Tip: ALWAYS Protect your base during installation.
Installers can accidentally drop heavy tools while working, or smear in adhesive or gunk from workboots onto the shower base.
The simple answer is to cut down the box we ship the base in. Use that instead of a tarp. Note that the box is white on one side and brown on the other when viewing the 30 second video to the left.